
On this page
1. Enable access and receive a new notification
- Read the introduction and permission guidance on first launch.
- Allow Chatview notification access in Android settings.
- Return to Chatview, check the connection and choose Continue.
- Receive a new notification from a supported app and check the inbox.
Contacts permission for displaying names for SMS numbers is optional; you can use the app without it.
2. Open a conversation to read messages and images
- Choose a conversation in the inbox; use an app filter if needed.
- Read saved messages in time order.
- Tap an available image preview to view it.
- To open the original app, read the guidance and explicitly choose to go there.
Images depend on what the original notification provides. Text can remain readable when an image is missing or expired, but not every message or photo is guaranteed to be saved.
3. Find a sender or remembered words
- Open search from the inbox.
- Enter a sender’s name or words from a message.
- Choose a result to open its conversation.
- Clear the search or go back when finished.
Search covers content saved in Chatview on this device, not the original messenger’s entire history.
4. Check availability before sending a text reply
- Check that the conversation’s reply input is enabled.
- Write text and confirm the receiving conversation.
- Choose Send and check the result.
- If it fails or the notification expires, check the state before manually retrying or using the original app.
5. Select apps for future saving
- Open notification-saving apps in Settings.
- Enable or disable the supported apps you want.
- Check the choice when the next notification arrives.
The list contains supported apps that have sent notifications, so an empty initial list can be normal. Newly discovered apps have saving enabled by default; adjust them as needed. Turning saving off leaves existing content under retention and deletion settings.
6. Check retention and the scope of deletion
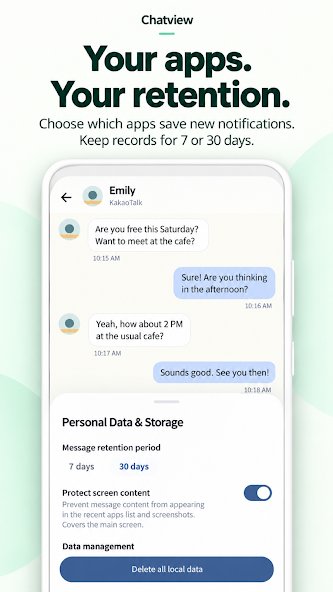
Retention
Choose 7 or 30 days in Settings. Changes also affect existing content’s expiry. Extending retention does not restore messages or images that have already expired and been removed.
Delete all saved content
- Choose Delete all in Settings.
- Check the scope and whether anything is still needed.
- Confirm and check completion. If an error remains, inspect the state and retry.
Display and privacy
Settings includes screen-content protection, System/Light/Dark themes, privacy policy, copyright and licenses. Messages are encrypted on this device; the app has no cloud-sync, backup or restore feature. Do not assume preservation after clearing app data or changing devices. Refer to the privacy policy for advertising and external services.
7. Check unexpected behavior
- No new messages appear
- Check notification access, the original app’s notifications and text visibility, and saving settings. Follow available connection-recovery guidance and check device battery restrictions.
- Reply input is unavailable
- The original notification may be gone or lack a reply action. Reply in the original app.
- Older conversations or photos are missing
- Content from before setup, hidden text and expired images cannot be recovered.
- What happens when access is disabled or the app exits?
- Disabling access stops new saving; existing content remains subject to retention and deletion. Press Android Back in the inbox and choose Exit to close the app. Exiting does not delete data or require an ad click.
For support, include app, messenger and Android versions, permission state and reproduction steps. Leave out actual messages, contacts and personal photos.